Thursday, April 25, 2013

Oh, the places we'll go

Would you believe that I dreamt last night that giant aphids terrorized my herbs to the point that everything died?  What a weirdo.  (Although I am pleased to report that Michelle's modified aphid spray works!  It requires repeat applications, but the number of aphids is significantly diminished.)  

Anyway, Evan and I are leaving for Holland and Italy tomorrow and I am very excited about all the wonderful things we will get to see.  My oma told my dad that they had a cold winter this year so all of the tulips are blooming a little later... so we'll make it just in time to see everything in full bloom!

(Thank you lonely planet for this image)
We also intend to see at least one glorious garden (Keukenhof!) while we're on our trip.  I will come back with pictures.  Until then, tot ziens and arrivederci! 

Sunday, April 21, 2013

Aphid Attack!

Yesterday, I went into my garden to take a look at how things were going.  I noticed my string of pearls has been rid of its mildew.  Hooray.  My parsley's whitefly problem is also greatly diminished with what appears to be numerous dead whiteflies on the dirt next to the plant.  Hooray again.  BUT as I looked closer, I saw that the whitefly in 3 days time has been replaced by... WHAT IS THIS??... APHIDS?!  


I gag.  Aphids to me are one of the most disgusting creatures alive, second only to the more disgusting cockroach. They hang out in huge groups on plants' stems and leaves literally sucking the life out of them to the point you would never even think of wanting to eat that plant.  Lest you think, "That picture looks awfully similar to the whitefly picture."  The main differences are, 1: they're bigger, about 3mm each  2: they're green (or sometimes black)  3: they're plump little pests  4: they don't fly.

Naturally, my next thoughts were how best to kill every single last one of these aphids.  For me, serious pesticides are out because I plan to eat this plant.  Even Neem oil which is pretty organic (it has medicinal uses) which I love in small doses is not something I really want to douse my plant in -- some sources mention studies that show that at least one of the component chemicals can in large doses cause temporary infertility.  Yikes.  

Fortunately, there are some easy organic home remedies that you can make yourself in no time at all -- garlic oil spray, tomato leaf spray, dish soap + water spray... the list goes on (here and here are a couple sources).  After looking at a couple sources, I decided to combine components of several for what I hope will be maximal killing effectiveness.

Michelle's modified aphid spray
You will need:
3-4 garlic cloves 
A small handful of tomato leaves
1 teaspoon cayenne pepper
2 tablespoons oil
500mL water
A spray bottle

Cut the garlic into a few smaller pieces.  Put the garlic and the cayenne pepper in the water and bring to boil.  Then toss in your tomato leaves.  Continue to boil for a few minutes and then lower the heat and let it all simmer together for another 20-30 minutes.  Let cool.  Remove the garlic and leaves, then add your oil.  Your aphid spray is complete.

Simmering aphid killing spray
Once you're done, fill the spray bottle with your aphid killer spray, shake and spray the crap out of your plant.  Actually you should probably do a test spot first, but being too impatient for that and knowing that aphids increase in multiples of 80 per week, I decided to forgo the test spot and trust in the fortitude of my parsley.

Die, assholes
We will see if this spray actually works.  I feel like oftentimes, pests scoff at these organic home remedies, "Please, woman. Garlic scented water?"  I will keep you updated.  

On the upside, I harvested my first herb crop of the year... it is quite beautiful.  (Nevermind that I spent about 35 minutes de-pesting my parsley with a leaf by leaf examination.  *sigh*)

Beautiful herbs!

Thursday, April 18, 2013

Oops, I did it again!

First, a word of wisdom:


On that note...

Oops, I killed a plant!


Soooo, that didn't take long.  I think the problem is too little water for a thirsty plant.  But especially since this has happened to me once before, I have decided that dill may be too fragile for my current gardening abilities (although the other plants are growing like crazy-- the parsley a little too crazy, it's crowding the lavender!  Maybe it's not me, it's you, Dill).

Oops, picked too small of a pot!
Same pot that killed my jasmine! Noooo!!
The rapid growth of my tomato plant was at first exciting.  Until it grew so tall that it started to look disproportionately large for the pot.  So I did some internet research and discovered that for indeterminate tomato plants, the minimum pot size is a 24 inch pot.  "Indeterminate" refers to tomato plants that do not produce all their tomatoes at once (most heirloom tomatoes are indeterminate).  This is in contrast to "determinate" tomato plants that do produce fruit all at once that need a pot at least 18 inches in size.  I don't think my pot is even 18 inches...

And oops, my plants are sick!


Once, a nice worker man at Armstrong Garden Center told me in response to my question regarding a serious pest problem in several of my plants that plants really should not get disease unless they are sick.  "That's mean," I thought, "my plants are not all sick."  The string of pearls succulent (with the mildew) could be a little stressed -- I just repotted it recently and it was looking a little tired beforehand.  But the parsley??  (The whitefly are the tiny little white specks.)  Hopefully it is not anything a little Neem oil cannot fix.

Here's another picture of whitefly, closeup (source from this informative site):

Actual size = 1-3mm each
I hope the whitefly do not become a problem -- last year, they got really out of control to the point that I couldn't stand next to my poor plant without feeling like I was going to inhale a swarm of them...

Well, on the upside, yes, I referenced a Britney Spears song today-- for any haters out there, I will just say she and I grew up together, not literally, and her music videos spawned a thousand late night dance routines in front of my mirror.  Mostly in college.  They were happy moments.

Monday, April 15, 2013

Murder

I feel like I've mentally neglected my little gardening blog recently in the busyness surrounding our upcoming trip to... wait for it... Europe!  This incidentally coincides with me turning 30 and being very nearly done with residency, which would be the first time I will have ever not been in school or training since preschool.  It has been a long road.  I have not, however, neglected my garden.  So better the blog than the garden, I guess...

Anyhow, about a week ago, as I was happily garden outside, I heard a loud CRASH! and turned around to see that the rack that we have in our protruding kitchen window (or whatever you call it) had collapsed, squashing one of my beautiful succulents which I had raised from babyhood, and tearing several leaves off in an apparent attempted murder.


so sad
I was naturally very upset.  "Just throw it away," says my husband, "We can get another one."  He is clearly missing the point.  But once I got over the initial shock, the question remained:  do leaves of succulents grow back?

Now you may know, succulents propagate like crazy.  They are like hydra of the plant world (you may remember hydra from your elementary school science fair-- the kids who had parents who did their science fair projects for them all used hydra that they chopped in half in different configurations).  For instance, see exhibit A, namely the piece of jade that independently fell of my big jade plant and grew roots...


Exhibit A: little roots with no preceding intervention
And now, exhibit B: the same piece of jade, subsequently repotted.  It is growing happily.

Exhibit B: happy growth
See also, exhibit C.  The jumbo piece of jade which also fell off my big jade plant.  I put it in a little pot of water and it has been growing for at least 6 months.  Maybe 8 months, I can't remember.  There is a whole root system now, and I anticipate replanting it at some point.


Exhibit C: jumbo jade
Now, I have seen multiple websites on regrowing Echeveria from the individual leaves-- this is a good one with proof in the pictures-- but I cannot determine from my google searches what will happen to the part of my Echeveria which was skinned alive.  Perhaps it will grow a bunch of little baby side Echeveria?  Perhaps it will dry off that part and nothing will happen?  

Anyway, I am glad that I kept the little leaves.  Perhaps I will end up with lots of little Echeveria babies to plant or give away.  And maybe this is a good experiment.  I will update you with the results.

Here's to regeneration!  Here's to the last week and a half of my twenties!  AND a shout out to my brother who has just turned 25 today!

Wednesday, April 10, 2013

On vertical gardening

So if you follow Pinterest at all, you probably know:  vertical gardening is popular.  At least in the pinning world.  

Vertical gardens range from the very elaborate (here is the how to)

yes, there is actually a how to...

To the more doable (another awesome how to)

The pallet vertical garden

The advantages are obvious to any balcony gardener-- maximum plant in a small space!  Plus, they are more visually delightful than a plain wall, and I would add that it is really wonderful to have plants that you might not get to see up close at eye level.  You can appreciate the smells and delicate features of tiny flowers which may usually be ground cover so much more.

The primary downside, in my opinion, is that watering is much more complicated.  The top dries out a whole lot quicker than the bottom because the water seeps down slowly hydrating the bottom far more than the top.  This is heightened by the fact that my planter is made of felt which already dries out quickly and likely the reason so many of these vertical gardens you see are with succulents.  Last year, when I bought this planter, even with regular watering, I had a hard time keeping my top plants alive even as the bottom thrived.  

But live and learn... this weekend, I replanted my very basic vertical garden with this wetness differential in mind.

Not as fancy, still vertical and great

In order from top to bottom, we have row 1: Dipladenia and the Santa Barbara Daisy, both very drought resistant, particularly as the Santa Barbara Daisy is a California native plant.  Row 2: French Thyme and Alyssum, of moderate water needs, and Row 3: a Figaro dahlia and mint, specifically mentha spicata (more on that in a later post).  Here's hoping this year's mini-vertical garden thrives!

This is what I mean by eye-level awesomeness


Saturday, April 6, 2013

The little things

Here's the things that are making me happy this week.

The first meyer lemon bloom of spring:


The incredible speed with which my heirloom tomato plant is growing:


About 3wks ago
Now
Delicious blueberries (which I promptly ate):


An unexpected gift succulent (thank you, Janice!):


And today, I spent most of the day gardening :)  Happy Saturday!

Tuesday, April 2, 2013

Arts + Crafts: Wine crate herb box

Every time I go outside or look out the window and see my herb box, it makes me happy.  As mentioned before, it was a bit more of a laborious process than expected, with two visits to the hardware store, a long visit to Michael's <shudder>, and multiple days required to drill the holes because my drill kept dying.  But  the end result was worth it!  And if you learn from the few small hangups I had, this is actually another very easy project.

First, you need a wine box.  As mentioned before, you can either beg one of a specialty wine store, or you can just buy one from winepine.com like I did.


Next, grab your tools.  I made my holes 7/8" in diameter.  There are drill bits especially made to drill holes through wood, just make sure they fit your drill.  The first bit I bought did not fit my "lady drill" (as the hardware store clerk called it), but I found another one that did.


Space your holes out for even and adequate drainage.  I do not know what the perfect number of holes is, but I decided on eight.  My lady drill, which is awesome as you can see, was plenty adequate... once it was charged.  (Next time, I will think ahead and charge it overnight the preceding night).


To avoid having all your dirt fall through the holes onto your patio, I recommend placing some sort of mesh over the holes.  After scouring Michael's, I found this plastic craft mesh, shaped like hearts, no less.  It worked perfectly!  I glued it in place with regular craft glue.


Next comes the fun part... pick your plants and plant away!  Take notice when you choose your plants that many wine crates (mine included) are only 7" in height, with individually sold plants often already in pots around 5" tall.  That does not leave too much room for soil at the bottom.  I probably would have chosen smaller plants if they had been available.


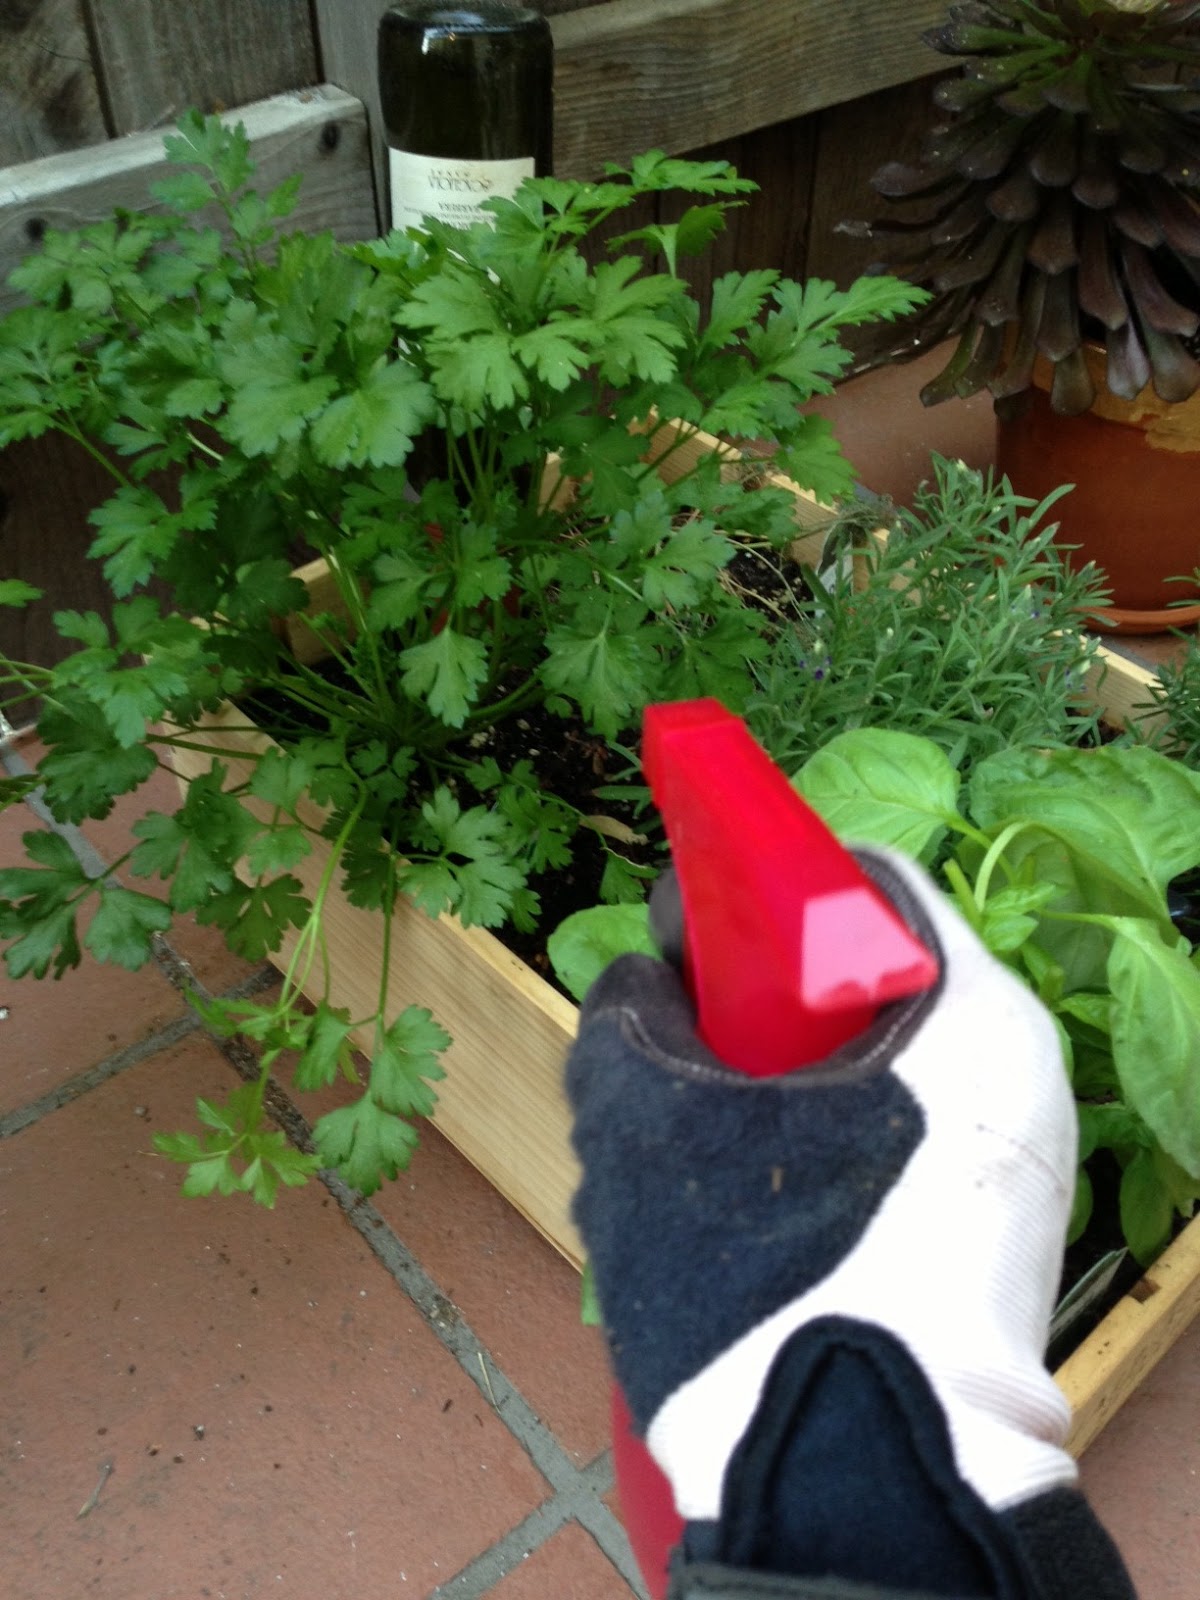
Now for some accessories -- to avoid root rot and water damage to your patio, little plant stands are great.  Also, another lovely addition is a plant nanny to make sure your herbs stay hydrated.  To use, place a an old bottle of wine, filled with water, upside down into the cone.  The water will slowly seep out through the terracotta.  This is more important if you sometimes neglect your plant babies or you have less drought tolerant herbs in your box. 


And then you're done, with a beautiful and functional wine crate herb box you can be proud of!